2. Creating CSS3 classes and IDs
CSS3 classes and IDs are ways to extend a style to
any element. For example, suppose you have a feature that you want to
add to just some items such as a yellow highlight. If you define a div or a p
element’s background color as yellow, all the text in either of those
containers will be bright yellow — not what you want. On the other hand,
if you have a class that defines a yellow background, all you have to
do is to assign that class to an element to lighten it up.
CSS3 classes
You create style classes in an almost identical way as you do element styles. The “dot” (.)
definitions used to create a class in CSS3 are labels you make up
instead of using element names. Figure 6 shows how to create a CSS3
class definition.
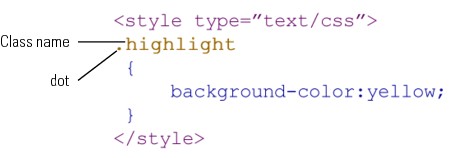
Figure 6: Creating class definition.
As you can see, the dot definition goes where the
element name goes. The rest is identical to CSS3 definitions for
elements. However, implementing a class style is a bit different because
it can be used in almost any element tag.
In order to see how we might want to use a bit of highlighted text, a very handy inline element is span. The <span> tag can be added in the middle of a block element and only change that part of the content in the span container without changing the rest of the block. To add a class to an element, you use the following format:
<element class=”myClass”>
Notice that the name of the class does not include
the “dot” from the dot definition. The dot is used only in the style
definition to let the parser know that the word is a class and not an
element. The following program gives you an example of how you might use the class with the <span> tag.
<!DOCTYPE HTML>
<html>
<head>
<style type=”text/css”>
body {
background-color:#F93;
}
.highlight {
background-color:yellow;
}
div {
font-family:”Comic Sans MS”, cursive;
font-size:18px;
}
h1 {
font-family:”Arial Black”, Gadget, sans-serif;
color:#930;
text-align:center;
font-size:20px;
}
</style>
<meta http-equiv=”Content-Type” content=”text/html; charset=UTF-8”>
<title>Halloween Highlight</title>
</head>
<body>
<h1>Halloween Party!</h1>
<div>You are invited to a Halloween Party on <span class=”highlight”>Saturday, October 29</span>. Costumes are <span class=”highlight”><i>de rigueur</i></span>.</div>
</body>
</html>
When you test the program, you’ll see that the two portions of the text within the <span>
containers are affected. Figure 7 shows how they’re displayed in a
Chrome browser on a Mac (top) and an Opera Mini browser on an iPhone
(bottom).
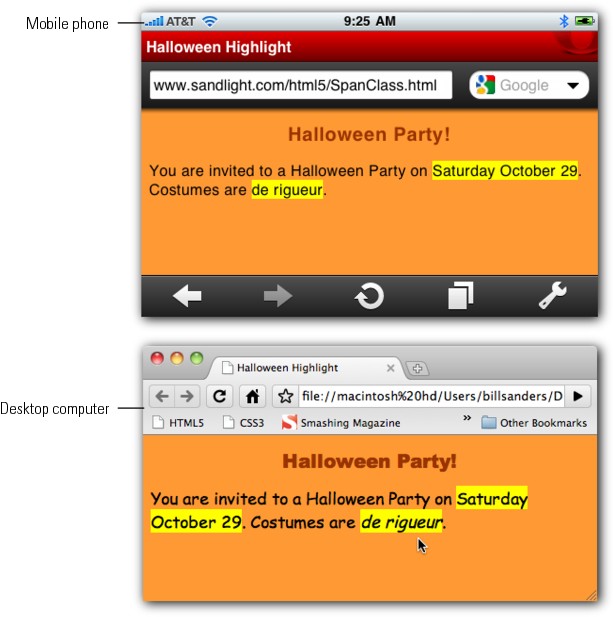
Figure 7: Class defined style in <span> container on desktop computer (top) and mobile device (bottom).
Both displays clearly show that the CSS3 class named highlight
is working fine. However, the Opera Mini browser displays neither the
defined fonts nor the italicized words. (The Safari browser does display
the italicized words, but not the defined fonts.)
CSS3 IDs
A CSS3 ID is set up almost exactly like a class except that it uses a pound sign (#) instead of a dot (.) in the definition. Further, in assigning an ID, you use ID instead of class
to specify which ID to use with an element. You even can use IDs and
classes with the same element. The following tag is perfectly correct:
<p ID=”this” class=”that”>
Both can select styles, and the ID provides a unique ID for the paragraph.
The ID has some major differences from a class. Both
a class and an ID can be used as style sheet selectors. However, an ID
has some other limitations and features:
• An ID can be used only once in a document.
• An ID can serve as an anchor .
• An ID can act as a script reference. That’s important for JavaScript.
• An ID can be used as a name in a declared object element — more stuff from JavaScript.
• An ID can be used by agents for processing information in translating an HTML document.
Of these features, you’ll be using only the first
two until you decide to incorporate JavaScript and other languages into
your résumé. Nevertheless, if you pay attention to these differences,
your Web pages won’t run into problems later on (and others will think
you’re a pro). The following example shows a use of the ID with CSS3:
<!DOCTYPE HTML>
<html>
<head>
<style type=”text/css”>
#littleHead {
font-family:Verdana, Geneva, sans-serif;
background-color:#9FC;
font-size:16px;
}
#javascript {
/* red */
color:#cc0000;
}
#php {
/* blue */
color:#009;
}
#actionscript {
/* green */
color:#063;
}
</style>
<meta http-equiv=”Content-Type” content=”text/html; charset=UTF-8”>
<title>Using IDs</title>
</head>
<body>
<div id=”littleHead”>Everything you always wanted<br>
to know about variables:</div>
<p id=”javascript”> JavaScript variables do not have to be given a data type.</p>
<p id=”php”> PHP variables can be nudged toward a data type with type hinting.</p>
<p id=”actionscript”> ActionScript variables must be assigned a data type.</p>
</body>
</html>
In looking at that code, you may have wondered what
the slash-asterisk (/* ... */) marks are. Quite simply, they’re comment
code for CSS3. Within a <style> container and in external style sheets, they work just like the <!-- --> comment marks in HTML5. Figure 8 shows what you’ll see when you test it.
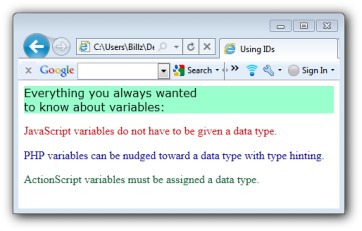
Figure 8: IDs in a Web page.
If you have a long Web page with discussions about
JavaScript, PHP, and ActionScript, the user may have to scroll down to
find the topic he wants. Using IDs, you can write the URL to include the
exact paragraph the user is trying to find.